1.Your first android application
1. Your First Android Application
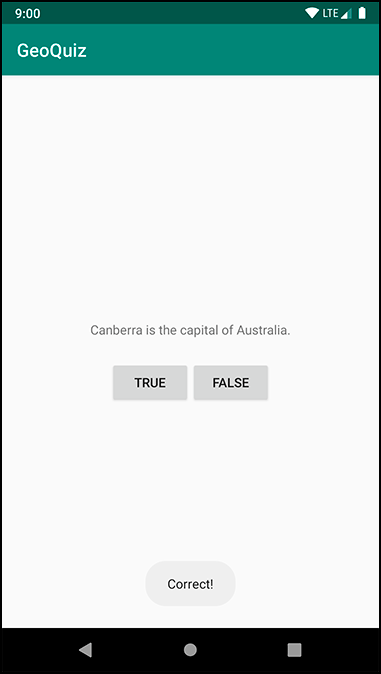
GeoQuiz (지리퀴즈 어플)
Activity와 layout을 이해하기 위해 만들어보는 어플이다.
An activity is responsible for managing user interaction with a screen of infromation.
GeoQuiz 프로젝트는 Activity 클래스의 subclass를 하나만 만들어서 정말 간단한 프로젝트라고 볼수있다.
A layout defines a set of UI objects and the objects’ positions on the screen.
- UI 오브젝트들은 버튼이나 글씨같은것들이다.
- XML 형식으로 쓰여진다.
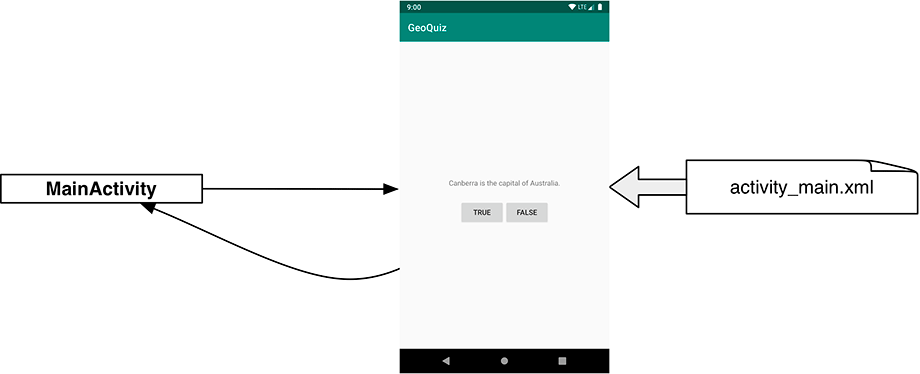
MainActivity 라는 Activity가 activity_main.xml 이라는 layout 파일에서 보여지는 UI 오브젝트들에 알맞은 상호작용을 책임진다.
- 간단히 생각하면, layout은 버튼을 만들고 activity는 그 버튼이 눌렸을때 일어나는 일을 결정한다고 보면 된다.
Laying out the UI
안드로이드 스튜디오에서 새로운 Empty Project를 만들면 자동으로 activity_main.xml 이라는 layout이 생긴다.
이 layout 안에는 ConstraintLayout과 TextView라는 두가지 View들이 생긴다.
- 모든 widget들은 View class의 instance거나 subclass이다. (예: TextView, Button)
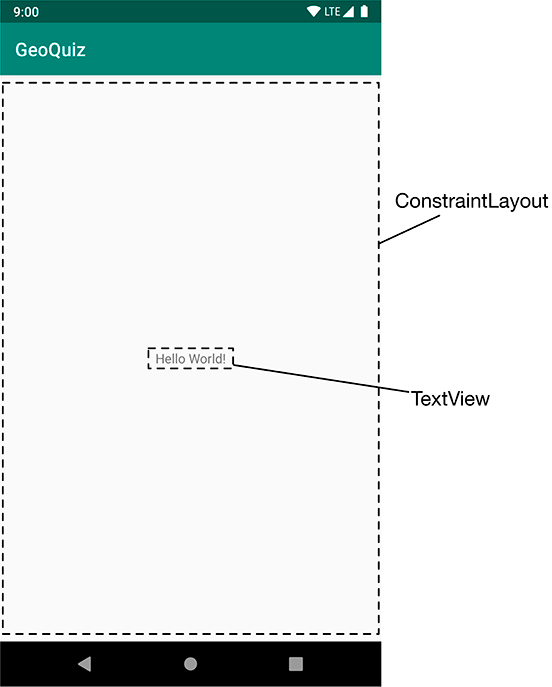
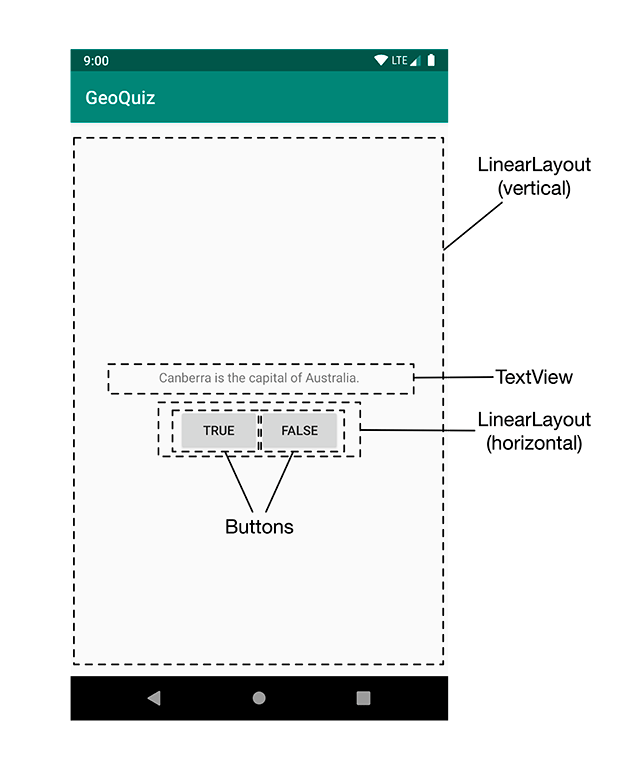
ConstraintLayout은 ViewGroup이고, TextView는 거기에 속해있는 자녀이다.
GeoQuiz에서 필요한 widgets들
- a vertical LinearLayout
- a TextView
- a horizontal LinearLayout
- two Buttons
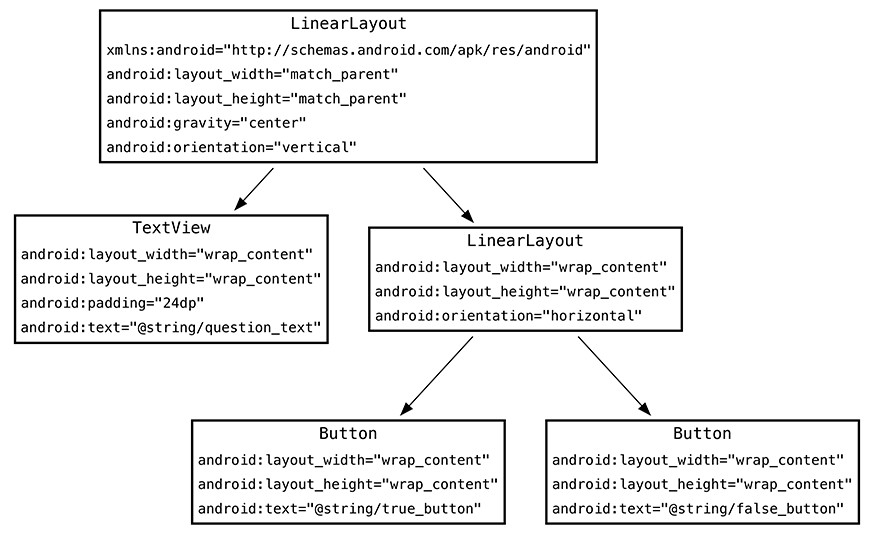
- 박스안에 있는것들을 attributes라고 한다.
- attributes들은 그 widget이 어떻게 구성되어야 하는지에 대한 설명이다.
<LinearLayout xmlns:android="http://schemas.android.com/apk/res/android"
    android:layout_width="match_parent"
    android:layout_height="match_parent"
    android:gravity="center"
    android:orientation="vertical">
    <TextView
        android:layout_width="wrap_content"
        android:layout_height="wrap_content"
        android:padding="24dp"
        android:text="@string/question_text" />
    <LinearLayout
        android:layout_width="wrap_content"
        android:layout_height="wrap_content"
        android:orientation="horizontal">
        <Button
            android:layout_width="wrap_content"
            android:layout_height="wrap_content"
            android:text="@string/true_button" />
        <Button
            android:layout_width="wrap_content"
            android:layout_height="wrap_content"
            android:text="@string/false_button" />
    </LinearLayout>
</LinearLayout>
가장 위에 있는 element 는Android resource XML namesapce(xmlns)를 명시해야한다. (http://schems.android.com/apk/res/android).
From Layout XML to View Objects
위에서 만든 xml을 View(UI 구성요소)로 만들기
일단 AppCompatActivity를 상속(extend)한 Activity 클래스를 본다. AppCompatActivity는 Activity 클래스의 서브클래스이다. 챕터 13에 더 자세히.
onCreate(Bundle) 메소드는 activity 클래스가 만들어질때 실행되는 메소드이다. Activity가 만들어지면 상호작용을 하기위한 UI가 필요하다.
public void setContentView(int layoutResID)
특정한 ID의 레이아웃을 가져다가 스크린에 표시하는 메소드이다.
이처럼 id를 정해줘서 activity에서 가져다가 쓸 수 있는데, widget에도 id를 정해줄 수 있다.
<Button
	android:id="@+id/false_button"
	android:layout_width="wrap_content"
	android:layout_height="wrap_content"
	android:text="@string/false_button" />
이런식으로 @+id 사인을 통해서 id를 새로 만들어 주는 것이다. 그냥 @string 이런식으로 하면 불러오는것.
이제 activity 에서
private Button mTrueButton;
private Button mFalseButton;

@Override
protected void onCreate(Bundle savedInstanceState) {
	super.onCreate(savedInstanceState);
  setContentView(R.layout.activity_quiz);

  mTrueButton = findViewById(R.id.true_button);
  mFalseButton = findViewById(R.id.false_button);
}
이렇게 Button이라는 object의 member variables를 만들고 리소스 아이디를 통해서 widget과 activity를 연결시켜준다. 이제 코드안에서 위젯을 가지고 뭔가를 할 수 있게 된다.
이제 이 버튼 오브젝트들에 listeners를 붙여준다. 안드로이드 어플은 보통 event driven 어플리케이션들 이다. 특정한 이벤트(클릭, 드래그 등)들이 일어날 때까지 대기하게 하는 것이다. 버튼이기 때문에 이번엔 클릭 리스너를 붙여준다.
mTrueButton.setOnClickListener(new View.OnClickListener() {
    @Override
    public void onClick(View view) {
				// 클릭 이벤트가 일어났을 때, 일어날 일 정해주기
    }
});
Anonymous inner class를 사용해서 View.OnClickListener 이라는 인터페이스의 onClick 이라는 메소드를 정의해준다.
Anonymous Inner Class in Java - GeeksforGeeks
Anonymous inner class 란?
자바 인터페이스 이해하기
mTrueButton.setOnClickListener(new View.OnClickListener() {
    @Override
    public void onClick(View view) {
        // something
        Toast.makeText(MainActivity.this, R.string.correct_toast, Toast.LENGTH_SHORT).show();
    }
});
Toast라고 화면에 뿅나왔다가 사라지는 알림 같은건데, 버튼을 눌렀을 때 그게 나오도록 한것이다. public static Toast makeText(Context context, int resId, int duration) 이렇게 구성된 메소드를 쓴것이다. Context는 Activity의 부모 클래스 이고 이상황에선 this가 View.OnClickListener을 뜻하기 때문에 MainActivity.this로 Context를 정해준다.